エムロジックでは、プラグイン開発をスピーディに行うために独自に開発したツールを使っています。
これは、現在、オープンソースとして、「SourceForge.JP: Project Info - MTPlugin-Starter」で公開していますので、自由に使ってもらえます。
今回は、このMTPlugin-StarterをWindows上で使うための方法を解説してみたいと思います。
MTPlugin-Starterの入手
まず、MTPlugin-Starter本体を入手しましょう。
Project File Listから、「mt-plugin-start-***.tar.gz(***はバージョンによって異なります)」をダウンロードして、解凍します。
解凍して出来た「mt-plugin-start.pl」がツール本体になります。
どこか適当な場所に保存しておいてください。
ここでは、「C:¥TOOLS¥MTPlugin-Starter」に保存したと仮定して進めます。
ActivePerlのインストール
MTPlugin-StarterはPerlという言語で書かれているので、これを実行できるようにしなくてはいけません。
ここでは、Windows用のPerl実行環境である「ActivePerl」を使います。
すでに、インストールしている場合は、それをそのまま使ってください。
「ActiveState - ActivePerl - The complete and ready-to-install Perl distribution. - Dynamic Tools for Dynamic Languages」からActivePerlをダウンロードします。

「Get ActivePerl」をクリックします。
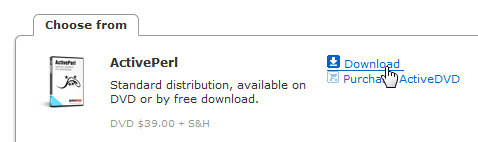
「Download」をクリックします。
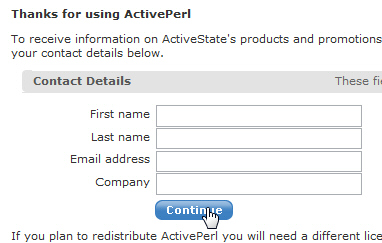
名前と、メールアドレスを入力してから、「Continue」ボタンをクリックします。
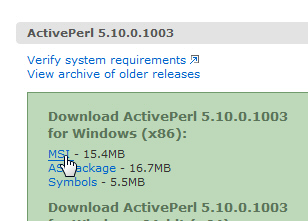
ActivePerl 5.10をダウンロードします。「MSI」をクリックしてインストーラをダウンロードします。
モジュールのインストール
標準のままでは足りないモジュールがあるので、それをインストールします。
Windowsのスタートメニューから、「アクセサリ」→「コマンド プロンプト」を起動します。
まず
ppm install YAML
と入力してから、ENTERキーを押し、YAMLモジュールをインストールします。
Downloading ActiveState Package Repository packlist...not modified
Downloading YAML-0.66...done
Unpacking YAML-0.66...done
Generating HTML for YAML-0.66...done
Updating files in site area...done
27 files installed
このような表示がされればインストール成功です。
続いて、Template-Toolkitをインストールするのですが、標準のままではインストールできないので、
ppm rep add uwinnipeg http://cpan.uwinnipeg.ca/PPMPackages/10xx/
と入力してから、ENTERキーを押します。
もし使っているActivePerlのバージョンが5.8なら
ppm rep add uwinnipeg http://theoryx5.uwinnipeg.ca/ppms/
としてください。
Downloading uwinnipeg packlist...done
Updating uwinnipeg database...done
Repo 4 added.
このように表示されます。
最後に、Template-Toolkitをインストールします。
ppm install Template-Toolkit
と入力してから、ENTERキーを押します。途中で
Proceed with install? [yes]
Under which directory? [C:¥Program Files]
と聞かれるので、どちらもENTERキーを押してください。
Downloading Template-Toolkit-2.19...done
Downloading AppConfig-1.66...done
Unpacking Template-Toolkit-2.19...done
Unpacking AppConfig-1.66...done
Generating HTML for Template-Toolkit-2.19...done
Generating HTML for AppConfig-1.66...done
Updating files in site area...done
Downloading Template-Toolkit-2.19 install script...done
Running Template-Toolkit-2.19 install script...
I can now install some optional tt2 stuff, including
documentation, examples, and the splash library, if you
like. This can go in any convenient location - the default
is "C:¥Program Files". The installation will go under
a "tt2" subdirectory of the directory you specify.
Proceed with install? [yes]
Under which directory? [C:¥Program Files]
Fetching http://theoryx5.uwinnipeg.ca/ppms/scripts/tt2.tar.gz ... done!
Extracting files under C:¥Program Files ... please wait ... done!
done
154 files installed
このようになれば、インストール成功です。
実際に使ってみる
ここからの作業もコマンド プロンプトから行います。
mt-plugin-start.plのあるディレクトリに移動します。
ここでは「C:¥TOOLS¥MTPlugin-Starter」にあるとして、
cd ¥TOOLS¥MTPlugin-Starter
と入力して、ENTERキーを押します。
では、実際にMTPlugin-Starterを使って、プラグインの雛形を作ってみます。
perl mt-plugin-start.pl
と入力して、ENTERキーを押します。
MTPlugin-Starterでは、対話的に雛形を作っていくことができます。
Your name: CHEEBOW
プラグインの作者名を入力します。これは、最初の一度だけ聞かれます。
ここからの作業は、入力後にENTERを押すことで入力内容を確定します。
Your site URL: http://cheebow.info/chemt/
プラグイン作者のサイトのURLを入力します。これも、最初の一度だけ聞かれます。
Plugin's version at start: [0.1]
プラグインの最初のバージョン番号を入力します。これも、最初の一度だけ聞かれます。
お好みで、「0.50」始まりにしても良いでしょう。
なお、これらの設定をあとで変えたいときは、
perl mt-plugin-start.pl --init
とすると、再度入力できます。
Enter your new plugin's name: Hello
プラグインの名前を入力します。
Do you want to include URL of documentation? (y/n): [n]
ドキュメントのURLをプラグインに含むかどうかを指定します。
「y」か「n」キーを押します。現在の設定は「[n]」のように表示されていて、これをそのまま使う時にはENTERキーを押すだけでもOKです。
Does your plugin have an original MT::Object? (y/n): [n]
独自のMTオブジェクトを持つかどうかを指定します。
Does your plugin have configure templates? (y/n): [n]
プラグインの設定を行えるようにするかどうかを指定します。
Does your plugin have scheduled tasks? (y/n): [n]
スケジュールタスクを使うかどうかを指定します。
Does your plugin have transformer? (y/n): [n]
管理画面の書き換え(Transformer)を行うかどうかを指定します。
Does your plugin have template tags? (y/n): [n] y
テンプレートタグを拡張するかどうかを指定します。
Does your plugin have text filters? (y/n): [n]
グローバルフィルタを追加するかどうかを指定します。
Does your plugin use any application callbacks? (y/n): [n]
アプリケーションのコールバックを使うかどうかを指定します。
Does your plugin use MT4 structure? (y/n): [n] y
MT4形式のプラグインにする場合は、「y」を入力します。「n」を入力するとMT3形式のプラグインの雛形が作成されます。
Your new plugin settings are...
Plugin Name : Hello
include documentation link : no
using MT::Object : no
using config template : no
using scheduled tasks : no
using transformer : no
using template tags : yes
using text filters : no
using app callbacks : no
using MT4 structure : yes
EVERYTHING IS OK? (y/n): [n] y
今までの選択状況が表示されます。
今回は、「Hello」という名前で、テンプレートタグを拡張し、MT4形式のプラグインを作るということになっています。
問題がなければ、「y」を入力します。
Creating Hello/plugins/Hello/mt-hello.pl
Creating directory Hello/plugins/Hello/lib/Hello
mkdir Hello/plugins/Hello/lib
mkdir Hello/plugins/Hello/lib/Hello
Creating Hello/plugins/Hello/lib/Hello/L10N.pm
Creating directory Hello/plugins/Hello/lib/Hello/L10N
mkdir Hello/plugins/Hello/lib/Hello/L10N
Creating Hello/plugins/Hello/lib/Hello/L10N/en_us.pm
Creating Hello/plugins/Hello/lib/Hello/L10N/ja.pm
Creating directory Hello/plugins/Hello/php
mkdir Hello/plugins/Hello/php
Creating Hello/plugins/Hello/php/block.mtcontainertag.php
Creating Hello/plugins/Hello/php/block.mtconditiontag.php
Creating Hello/plugins/Hello/php/function.mttag.php
Creating directory Hello/docs
mkdir Hello/docs
Creating Hello/docs/mt-hello.html
Creating Hello/docs/mtdocs.css
...............finished!
このように表示され、Helloプラグインの雛形は、mt-plugin-start.plがあるのと同じディレクトリの「Hello」ディレクトリの中に作成されます。
この後は、その雛形を元にして、実際のプラグインを作っていくということになります。
面倒だった、MTプラグインの最初のステップが大幅に改善されます。
ぜひ、お試しください!